This easy Dutch oven jalapeño cheddar bread requires no kneading and is ready start-to-finish in just a few hours! It's perfect for dunking into your favorite tomato soup or as the base for grilled cheese sandwiches.

We're pulling a fan-favorite recipe out of the vault today! This jalapeño cheese bread has been in my regular baking rotation for years, but the recipe was previously only available to our Everyday Artisan Bread course students.
As fall approaches, though, our team decided we love this loaf too much to keep it a secret. So world, meet our favorite jalapeño cheese bread!
(Alternate title that I cannot believe my staff rejected: Jalapeño cheddar bread (Life As A Strawberry's Version) (From the Vault). IYKYK.)
We're baking this jalapeño bread in a Dutch oven to get a nice, crusty bread with a soft interior. (No Dutch oven? No problem - check out one of these alternative methods!)
Jump to:
Ingredients
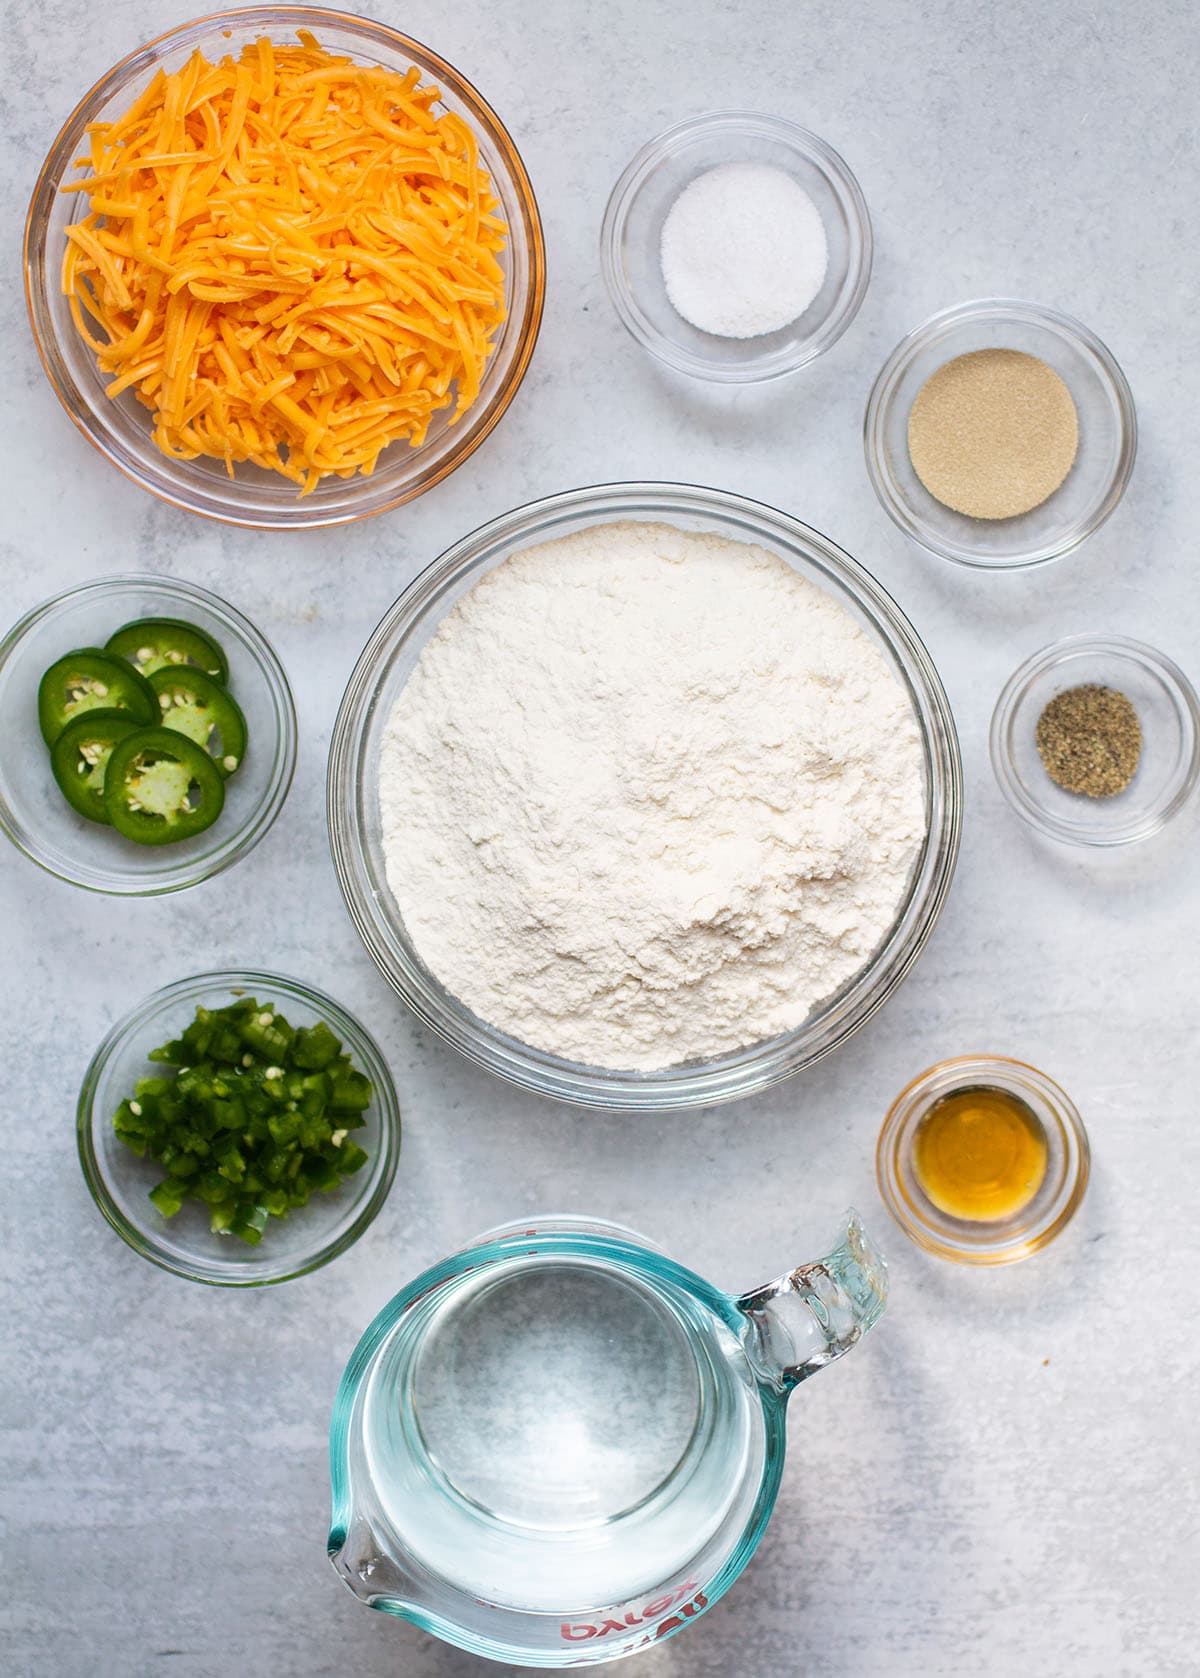
This is a pretty straightforward bread recipe: if you've made our Easy Crusty Bread before, this jalapeño bread will feel nice and familiar. Here's what we're working with:
Basic dough components
- Yeast - We love Active Dry Yeast because it's reliable and moves quickly without compromising on flavor. (You can swap Instant Yeast if you want to - just reduce the amount by 25% and keep an eye on the dough since it may rise more quickly.)
- Honey - Adding a bit of honey at the start of this recipe helps the yeast activate and foam up (called blooming).
- Warm Water - A good rule of thumb is to use water that is "warm to the touch", between 95° and 110° Fahrenheit. If the water is too hot, it will kill the yeast (and your bread won't rise).
- Salt - Every brand of salt is a little bit different, which can make it tough to measure by volume (with teaspoons). We recommend measuring by weight to keep things simple - weight measurements are the same no matter what brand of salt you use! We use Diamond Crystal Kosher Salt in our baking; if you use Morton Kosher salt or any type of table salt and are measuring by volume, you'll want to reduce the salt a little bit in this recipe.
- Flour - After extensive testing, we recommend using King Arthur All Purpose Flour (our #1 choice) or Bob's Red Mill All Purpose flour in your bread baking. These flours have a high protein content, which basically just means they'll do the best job at getting you a taller, airier loaf (we go into this in so much more detail in Everyday Artisan Bread). You can also use bread flour in place of all purpose flour if you have it on hand!

Mix-Ins
- Jalapeño - Cut a few slices off the jalapeño to use as a garnish, then de-seed and dice the rest to mix into your dough. (If you don't care about using jalapeño slices as a garnish, you can just dice the whole thing and add it to the dough!)
- Fresh cracked black pepper - A tiny bit of black pepper lends a ton of depth to this loaf of bread.
- Shredded cheddar cheese - Shredded sharp cheddar melts into the dough as it bakes for a smooth, buttery texture. We're also adding a handful of cheese on top of the loaf for a gorgeous crust!
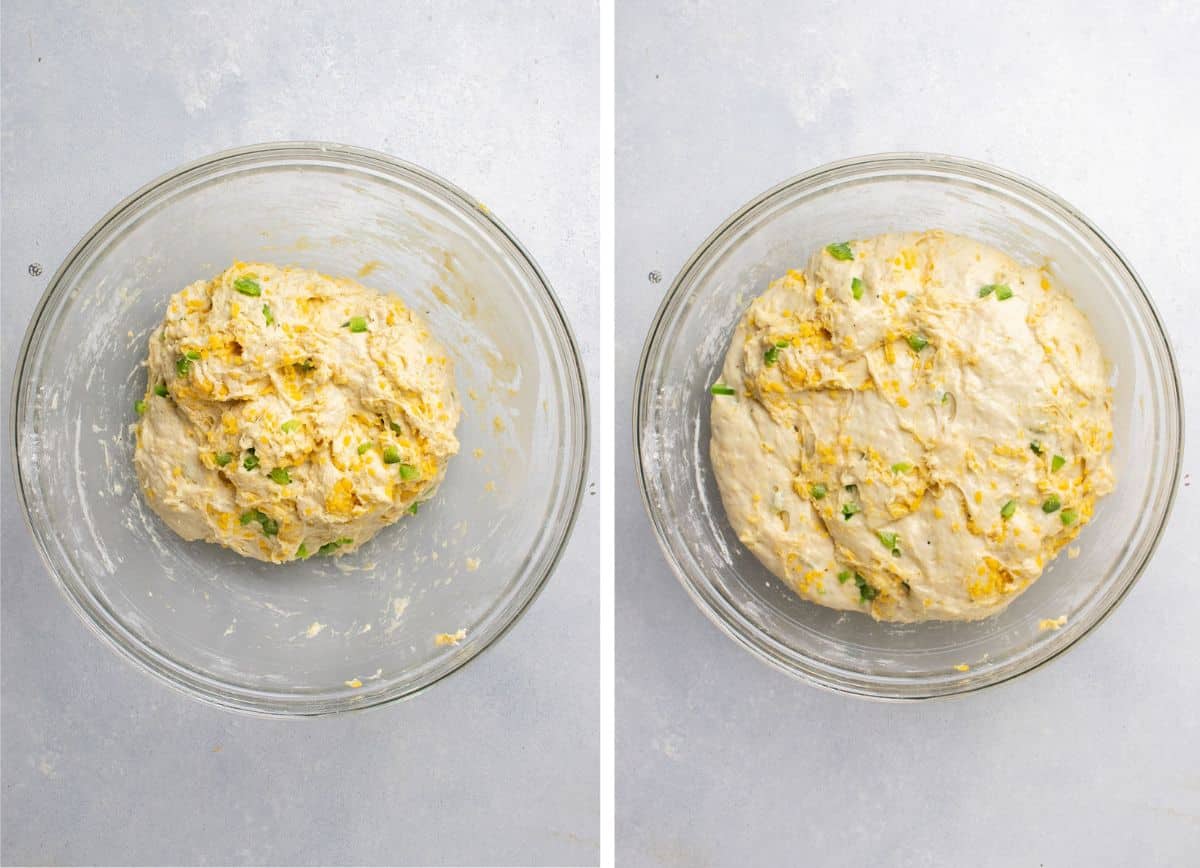
Our baking timeline
This cheese and jalapeño bread is ready to eat in less than 4 hours, and most of that is inactive time. Here's a quick snapshot of our order of operations:
- Proof the yeast and prep the other ingredients - 10 minutes
- Mix the dough - 5 minutes
- Let it rise - 1 hour
- Shape the loaf - 5 minutes
- One final rise - 30 minutes
- Bake - 40 minutes
- Let it cool - 1 hour
Serve this bread fresh with a hearty chili recipe or our creamy beer cheese soup, slather it with a bit of cream cheese or a drizzle of honey, or use it as the base for an out-of-this-world grilled cheese sandwich (it also makes an incredible savory French toast).
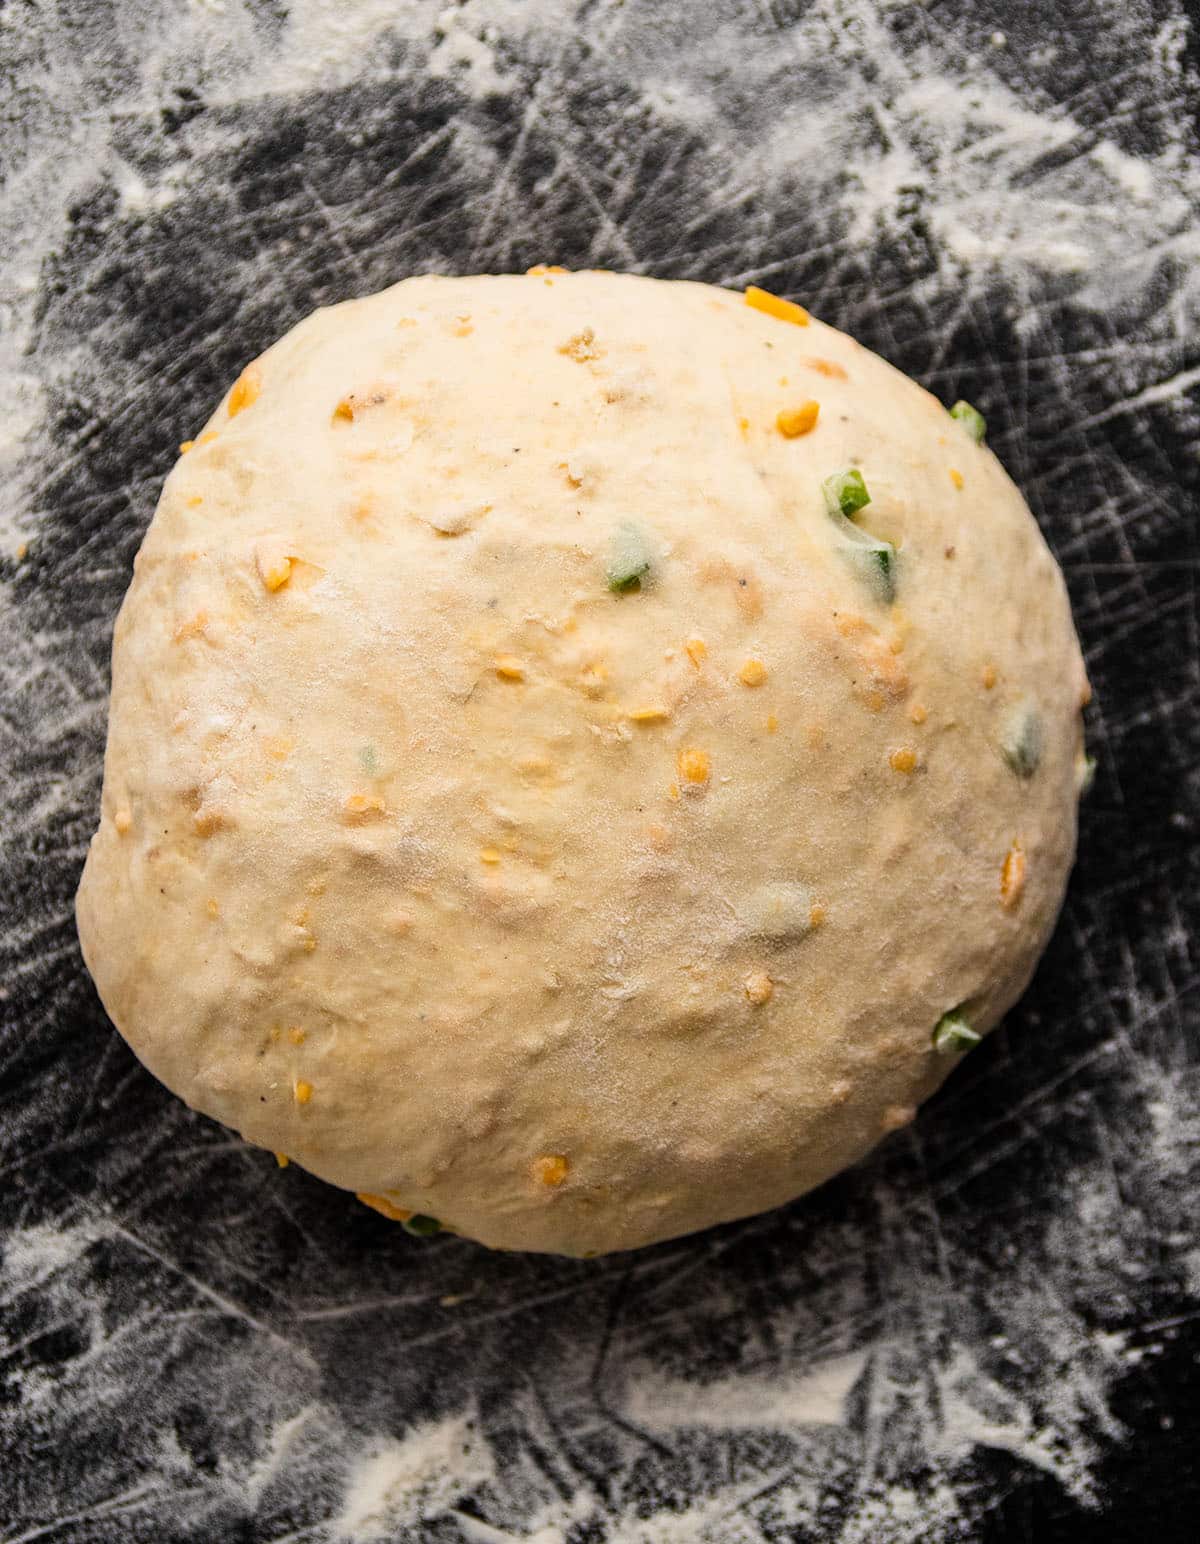
PS - This is a slack (wet) dough
Don't worry if the dough feels shaggy or sticky right after mixing. It won't form a tight, elastic ball or pull away from the sides of a mixing bowl the way that some recipes do, especially since we're adding extra ingredients to the mix.
If you're brand new to bread baking or a little nervous about working with such a slack dough, feel free to add a little bit of extra flour (it will still taste great!)
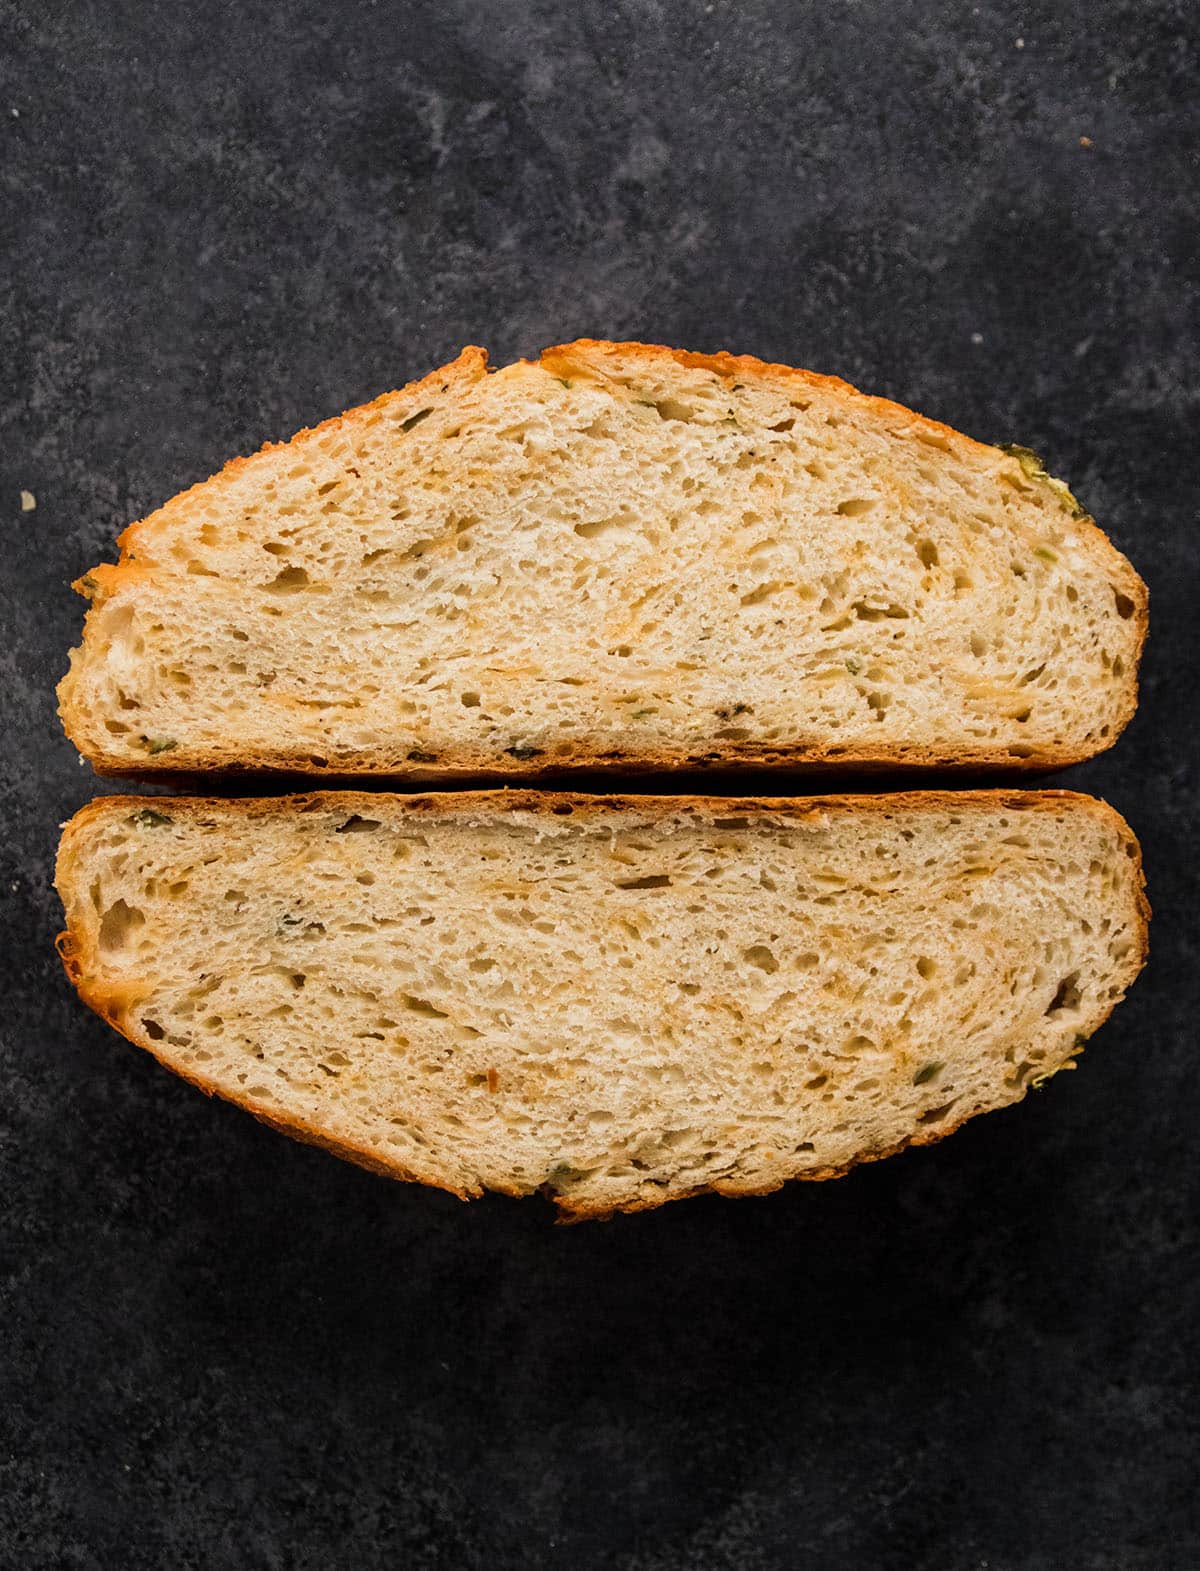
The cheese here also makes for a slightly denser loaf than our Easy Crusty Bread or a homemade sourdough, especially on this quick baking timeline. You won't really see any big air pockets develop in the bread, and it may not be quite as tall. If you're interested in building bigger air pockets into the dough, though, check out our FREE, 1-hour Artisan Bread Bootcamp - we share a ton of tips for taller, airier bread in that webinar!
A quick review of bread best practices
We've tested hundreds of bread recipes and taught tens of thousands of people to bake bread with our Easy Crusty Bread recipe and our Everyday Artisan Bread course. Along the way, we've honed in on a few tips: follow these guidelines for excellent no knead jalapeño cheese bread bread.
Our #1 baking tip: use a kitchen scale!
Measuring by volume (with cups) is notoriously unreliable. For example, everyone measures a cup of flour a little differently: it’s easy to accidentally use too much flour in a recipe and end up with dry, dense bread. (We've run a ton of tests on this - check out our free Bread Bootcamp for a more detailed look at the results!)
Different brands of salt also have larger, heavier flakes: A teaspoon of one brand of salt can actually be much saltier than a teaspoon from a different brand.
But when you use a kitchen scale to measure by weight (in grams), you get a perfect measurement every time.
No kitchen scale? Measure your flour with the scoop and level method for best results!
Adjust rise times depending on the weather.
If your kitchen is especially chilly, you may need to extend the rise time for your bread to fully double in size (and if it's especially warm, it may not take the full hour!)
Note: We don't recommend letting this dough rise more than 90 minutes during its first rise; you don't want cheese sitting out on the counter that long! If your dough still hasn't quite doubled after 90 minutes, transfer it to the fridge for a few hours or just go ahead and shape and bake it as directed. It'll still taste great!
Use high quality flour
The type of flour you use matters. A LOT. We recommend baking with King Arthur flour for best results - their flours are the most consistent, and they have a high protein content (which gives you a stronger, more elastic, less sticky dough!)
Riffs and Substitutions
- Adjust the spice. This recipe makes a loaf with a fairly mellow spice profile. If you want more smack-you-in-the-face spice, leave the jalapeño seeds in or add some extra pepper. You can also roast the jalapeño beforehand for extra depth of flavor! (No jalapeños handy? A poblano pepper works well here too!)
- Swap the cheddar cheese for white cheddar, asiago, mozzarella, or gruyere.
- Add extra mix-ins like roasted garlic, chopped crispy bacon, or crumbled feta cheese.
- Can I use rapid rise or instant yeast for this recipe? Yes - just reduce the amount of yeast to 1 ½ teaspoons (about 25% less than we use with Active Dry Yeast).
- Adjust the flours. Replace some or all of the AP flour with Bread Flour if you like. Bread flour is a little bit higher in protein, which means it will give you a smoother, more elastic dough and a slightly taller loaf. You can also replace up to 100 grams of the flour in this recipe with whole wheat flour. (We don't recommend using more whole wheat flour than that, because it will change the texture of the loaf and give you a denser crumb.)
- Make a different shape! We love the classic round loaf, but this dough is also excellent when used for rolls, pizza dough, or as the base for some cheese bread sticks. You can also bake it in a regular loaf pan for sandwiches!

FAQ time!
Yes! Check out our small batch crusty bread recipe for more guidance on baking mini loaves.
This makes a pretty large loaf of bread: a double loaf is a bit too big to fit comfortably in a Dutch oven. If you'd like to double the recipe, we recommend mixing the dough all together and dividing it into two separate loaves for baking. Make and shape the dough as directed, store one loaf (in its proofing basket) in the fridge while the first loaf bakes, and then bake the second loaf once the first loaf is done.
Yes! We love using a Dutch oven to create a crispy, crackly crust on our bread, but it's definitely not the only way to bake great bread at home. Check out our post about how to bake bread without a Dutch oven.
There's quite a bit of cheese in this dough, which gives us a slightly denser loaf and makes it even more important to build strength into our dough. In this recipe, we primarily do that by 1) letting the dough rest for a few minutes before we add the mix-ins if possible and 2) folding the dough over on itself while shaping, until the dough feels stiff and begins to resist our folds. This can take some practice, so don't worry if the bread is on the flatter side the first few times! If you're new to baking, we recommend starting with our Easy Crusty Bread to get a feel for the shaping technique. We also share several techniques for taller, stronger loaves in our free Bread Bootcamp Webinar. And of course, you can skip the learning curve entirely and let us take you through homemade bread A to Z in our Everyday Artisan Bread course!
You can replace up to 100 grams of the All Purpose flour in this recipe with whole wheat flour if you like. We don't recommend using more than 100 grams of whole wheat flour here; it will change the texture of the loaf and result in a denser crumb.
Yes - we recommend storing this bread in the fridge or freezer (instead of on the counter). The fridge can dry bread out pretty quickly, so we like storing leftover slices of this loaf in the freezer to preserve the texture. When you're ready to reheat it, just pop a slice or two into a warm oven for a few minutes to toast them back up!
Have another question?
See even more detailed FAQs about bread baking in our Easy Crusty French Bread post, learn to bake taller, airier loaves with our FREE Bread Bootcamp Webinar, or enroll in our Everyday Artisan Bread course for personal support and step-by-step training videos that take you through every technique and buzzword!
Video: How to Make Jalapeño Cheddar Bread
Did you make this recipe? Leave a comment and star rating below to let us know how it turned out!
Print📖 Recipe

Easy Jalapeño Cheese Bread
- Prep Time: 20 minutes
- Inactive Time: 2 hours 30 minutes
- Cook Time: 40 minutes
- Total Time: 3 hours 30 minutes
- Yield: Makes 1 loaf 1x
- Category: Bread
- Cuisine: American
- Diet: Vegetarian
Description
This easy jalapeño cheese bread is ready in just a few hours and perfect with soup!
Ingredients
- 9 grams active dry yeast (about 2 ¼ teaspoons)
- 6 grams honey (about 1 teaspoon) (use sugar if you prefer)
- 300 grams warm water (about 1 ¼ cups)
- 1 large jalapeño
- 400 grams All Purpose Flour (2 ½ - 3 ½ cups), plus extra for dusting (see recipe notes)
- 8 grams kosher salt (1-2 teaspoons, depending on brand)
- ¼ teaspoon fresh cracked black pepper
- 125 grams shredded cheddar cheese (1 ¼ cups), divided
Instructions
Proof the yeast:
- Add yeast, honey, and warm water to a large mixing bowl (you can also use a stand mixer fitted with a dough hook). Let the yeast proof for 5-10 minutes, until the mixture is foamy. (If your yeast mixture doesn’t foam up, your bread won’t rise).
Prep the jalapeño:
- Trim the stem off the jalapeño and cut 4-5 round slices off the top of the pepper. Set these slices aside (we’ll use them on top of the bread later)
- Deseed and dice the rest of the pepper. You should have about ½ cup of diced jalapeño.
Mix the dough and first rise (1 hour):
- Add flour to yeast mixture. Mix with a sturdy spatula until nearly all of the flour is incorporated. Note: If you have time, let the bread rest here for 15 minutes or so before moving on to the next step - it will make it easier to mix everything together and give you a slightly taller loaf!
- Add salt, pepper, diced jalapeño, and most of the shredded cheddar cheese (save a handful of cheese for topping the bread later!). Use a sturdy spatula or clean hands to mix everything into the dough until ingredients are evenly distributed and no dry flour remains. The bread should be slightly shaggy and sticky.
- Cover bowl with a clean tea towel and let rise on the counter for about 1 hour, until dough has doubled in size.
Shape the dough and final rise (30 minutes):
- When dough has risen, place an empty dutch oven (with the lid on) in your oven and heat to 460° Fahrenheit.
- Lightly flour a large cutting board.
- Tip the dough out of the bowl and onto the cutting board. DO NOT PUNCH THE DOUGH DOWN - you want to keep all those nice air bubbles intact so you have an airy, delicious loaf of bread. (Note: If the dough is sticking to the bowl a little bit, wet your hand with a bit of cold water and gently separate the dough from the bowl to get it all out).
- Shape the dough into a round loaf: Pull each corner of the dough in towards the center (like you're folding an envelope) and repeat until the dough feels tight and begins to resist your folds. Add more flour to the cutting board as you go if needed. Flip the dough over and pull it into a round loaf.
- Flour a proofing basket or a medium-sized mixing bowl and place your loaf into it seam-side down. Cover with a tea towel and let rise another 30 minutes or so while you preheat the oven. Note: I like to line my proofing basket or mixing bowl with a clean linen napkin to distribute the flour more evenly and help with cleanup.
Add toppings and bake (30 minutes)
- When the oven is hot, you're ready to go! Lay a piece of parchment paper down on your counter or cutting board (optional - it makes transferring the bread easier!)
- Tip your bread dough gently out of the proofing basket onto the parchment paper.
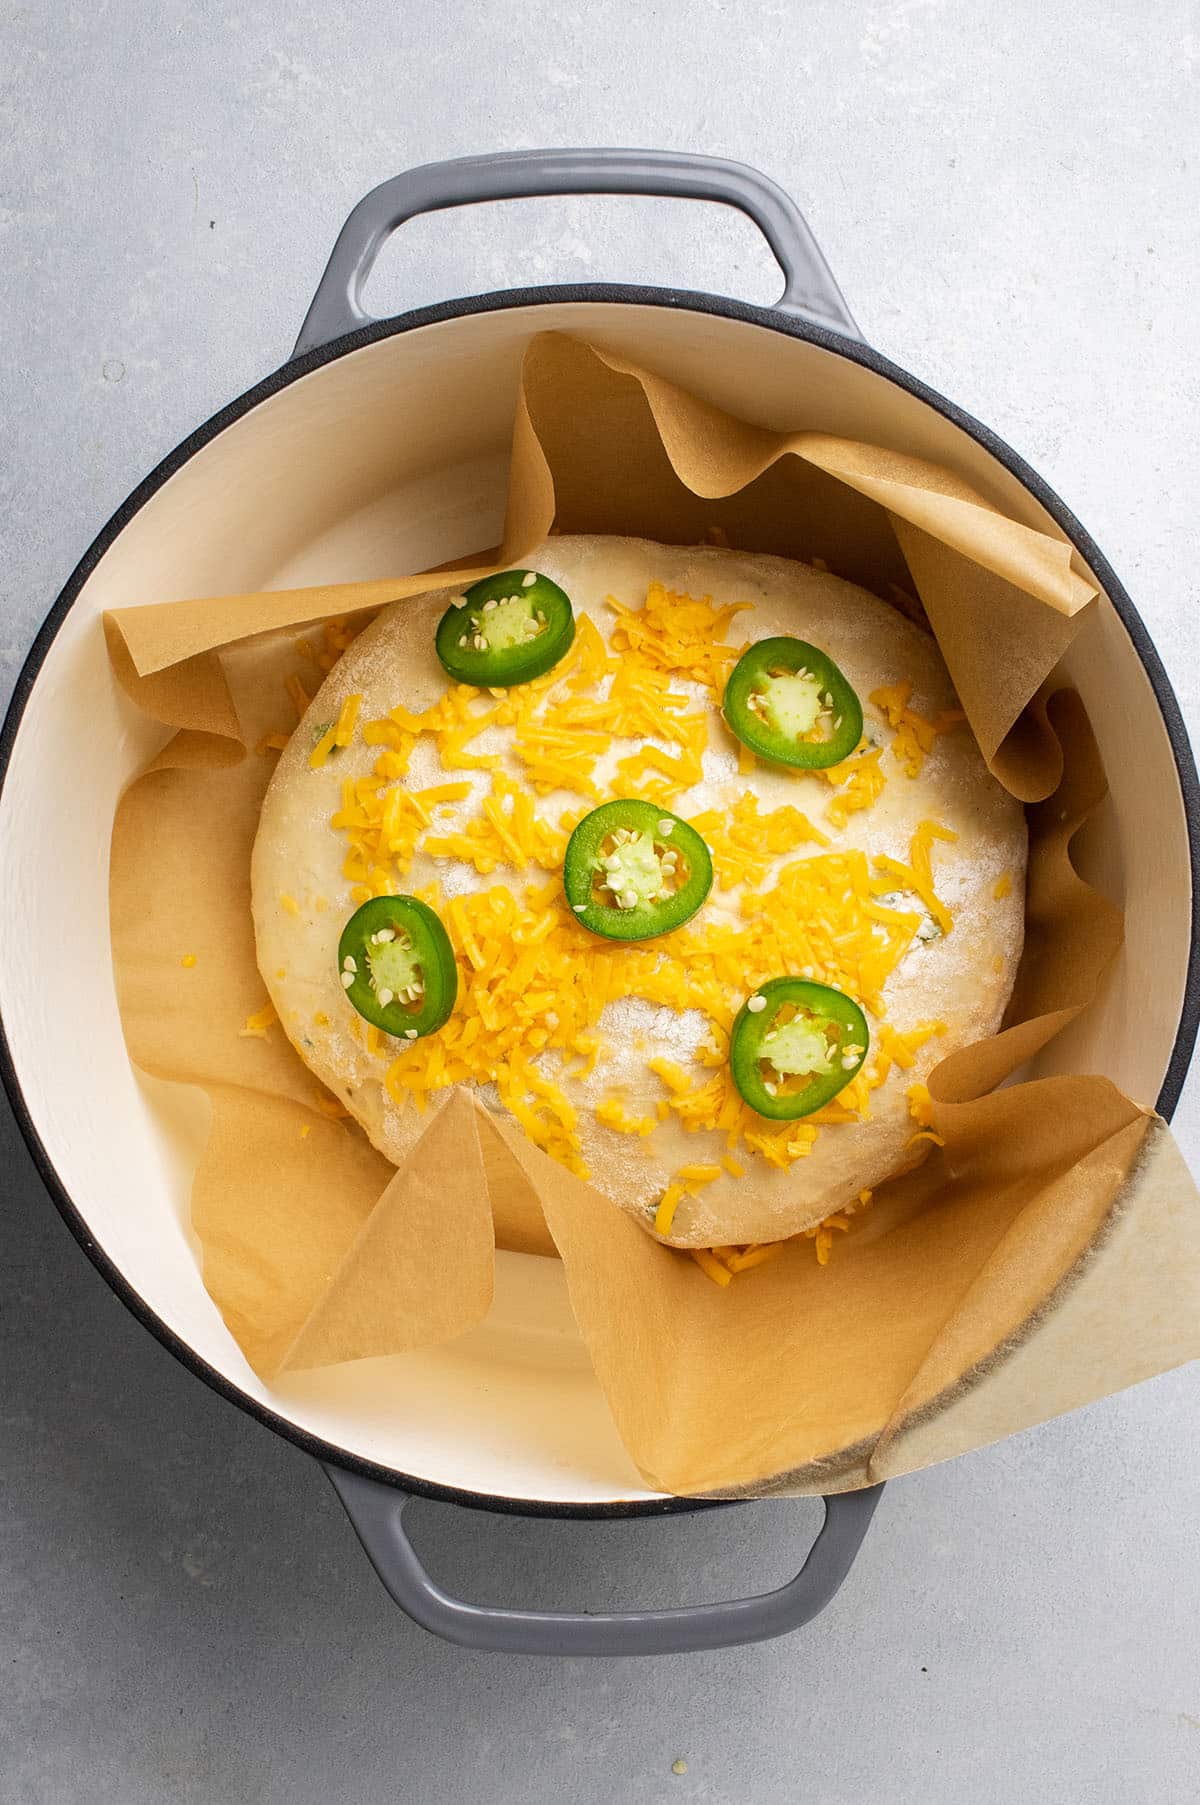
- Sprinkle remaining cheese over the top of the bread. (If the surface of your loaf is try, brush it with a bit of water to help everything stick). Lay jalapeño slices across the top of the bread.
- Use oven mitts to pull the dutch oven out and remove the lid.
- VERY CAREFULLY (without burning yourself!) use the sides of the parchment to lift the bread up and place it into the hot Dutch oven.
- Put your oven mitts back on, place the dutch oven lid back on the pot, and slide the whole thing back into your hot oven.
- Cook bread for 30 minutes.
Remove the lid and finish baking (5-15 minutes)
- After 30 minutes, remove the lid from your dutch oven. The bread should be taller, crusty, and very lightly browned. Continue cooking the bread, uncovered, for 5-15 minutes more until the bread has deepened in color and you have a beautiful brown crust.
- When bread is done, use oven mitts to pull the pot out of your oven.
- Use a long spatula or the corners of your parchment paper to lift the bread out of the dutch oven and onto a cooling rack. Let cool for at least 1 hour before cutting into it.
Notes
If you have a kitchen scale, please use it! Measuring by weight is much more accurate than measuring by volume (with cups) and will give you more consistent bread. That being said, you can certainly make great bread without a kitchen scale! To measure flour in cups: If you measure flour by dipping your cup straight into the bag or bin and shaking off the excess, plan to use about 2 ½ cups of flour. If you measure by stirring the flour with a spoon or scoop before scooping it into a measuring cup and leveling it off, plan to use about 3 cups of flour. You can always add more flour if you need to - just be aware that this is a relatively slack (wet) dough, so it will be a bit shaggy and sticky at first (but it will smooth out and become more elastic as it rises and again as you shape it!)
Equipment notes. We recommend a 4- to 6-quart Dutch oven for best results. Le Creuset, Staub, Marquette Castings, and Lodge are all good choices. As always, please check the care instructions on your equipment: Be sure your Dutch oven is safe at high temperatures and double-check that it has a metal (not plastic) knob on the lid. We use an 8.5-inch proofing basket, but an 8- or 9-inch banneton or medium-sized mixing bowl also work well for the final rise. Be sure to use parchment paper here (not waxed paper).
Ingredient notes. For best results, use a high-quality flour for this recipe: We recommend King Arthur Flour and Bob's Red Mill flour. This recipe was developed with Diamond Crystal Kosher Salt, which is colloquially known as the "least salty salt." If you need to use table salt or another fine salt and you are measuring by volume with a teaspoon, reduce the amount of salt by ¼ teaspoon (if you're measuring by weight, don't worry about what brand of salt you're using - just follow the gram measurements!)
How hot should my water be? A good rule of thumb is "warm to the touch." Too-hot water (typically 130-140 degrees F and above) will kill your yeast, but use too-cold water and your yeast will take too long to activate. We like to use water that's between 95 and 110° Fahrenheit. You should be able to comfortably hold your hand under water running at about 100 degrees - it should feel warm, but not hot. Use a kitchen thermometer for a precise measurement if you like!
Additions and substitutions. Use bread flour in place of all purpose if you like. Use additional jalapeños for extra spice (or reduce the amount of pepper in the dough for a more mellow taste). Swap the jalapeño for poblano pepper. Add roasted garlic cloves to the dough for extra flavor. Use white cheddar, asiago, havarti, or parmesan in place of the cheddar cheese if you prefer. If you don't have honey, use sugar in its place. Replace up to 100g of all purpose flour with whole wheat flour if you like.
No Dutch oven? See this post for alternative baking methods (you can still make great bread without fancy equipment!)
How to store this bread. We don’t recommend storing this bread on the counter since the cheese won’t keep well at room temperature. If you have any leftovers, pop them in the freezer until you’re ready for them! You can store extra bread in the fridge for a day or two, but the fridge will dry the bread out pretty quickly.
Want a taller loaf of bread? The cheese does weigh this dough down a bit: it won’t be as tall or airy as other loaves. Check out our FREE Bread Bootcamp Webinar for our favorite techniques to make taller, airier loaves! One of our favorite tips: Cover the dough and put it in the fridge overnight for its first rise.
Does the cheese burn? We haven’t had any issues with the cheese burning - but if you’re worried about it, you can reduce the oven temperature to 425° F when you put the bread in and/or turn off the oven for the last few minutes of baking (when you remove the lid).
Still have questions? We cover a ton of other info in the FAQ section in our Easy Crusty Bread recipe!
Nutrition
- Serving Size:
- Calories: 255
- Sugar: 1.3 g
- Sodium: 493 mg
- Fat: 5.8 g
- Carbohydrates: 40.5 g
- Protein: 9.3 g
- Cholesterol: 15.5 mg
Keywords: bread, baking, fall






Amy
Finally a jalapeno cheese bread that's perfect! I added lots of fun spices like garlic powder, onion powder, jalapeno spice, etc. I don't have a Dutch oven so I used a pan with tin foil and it still came out perfectly. I will always use this recipe only from here on out. I've tried so many and none came out as yummy as this one did!
★★★★★
Team Life As A Strawberry
We're SO happy you loved this bread! Check out our How To Make Crusty Bread Without A Dutch Oven post for more tips on baking without a Dutch Oven.
Amy
Thank you for that tip! I read through it and prepared to remake with one of the tips but I found a round, deep casserole dish I owned with a lid (stoneware) so I used that instead. While the first loaf was amazing, this loaf was chewy and fluffier! I don't know why it keeps disappearing, I mean, there's only two of us and it remains a mystery. So, I guess I'll make another loaf again tomorrow. Paul Hollywood would have given me a handshake for this loaf but you would have deserved all of the credit!
★★★★★
Team Life As A Strawberry
What an incredible compliment! We are so happy you are loving this loaf!
Karina
I want to make two smaller loaves for bread bowls with this recipe. How should I adjust temp/cook time?
★★★★★
Team Life As A Strawberry
Our small batch crusty bread recipe has all the tips for baking a smaller loaf! Use the jalapeno cheese bread dough split into two loaves and bake according to the instructions of the small batch recipe! We also have a recipe for wheat bread bowls that has helpful bread bowl tips!
Pam
This came out perfectly!My husband assumed I had bought it at an upscale bread bakery in town lol. Thanks for sharing this awesome recipe. Very flavorful and professional looking!
★★★★★
Team Life As A Strawberry
WAHOO! What a fantastic compliment!
Morgan
Another great bread recipe from you. I don't know if I'll ever make bread with any other method again. So delicious! Love the addition of the pepper, jalapenos, and cheese too!
★★★★★
Team Life As A Strawberry
WAHOO! We're so happy to hear how much you loved this loaf!
nancy
love how cheesey and flavour this jalapeño cheddar bread is. thanks for your tips to help me nail it!
★★★★★
Team Life As A Strawberry
We're SO happy to hear that you nailed it!
estee_bestie
OMG that cheesy crust!!! this looks insane! we love jalapeños around here, cannot wait to try it!
★★★★★
Team Life As A Strawberry
YAY! We hope you love it!
Andrea
Oh my, no knead bread with jalapenos and cheese, deliciousness!
★★★★★
Team Life As A Strawberry
We hope you love it!
Tayler
I made this cheese bread with dinner last night and it was fantastic! Thanks so much for sharing the recipe!
★★★★★
Team Life As A Strawberry
We're SO happy to hear you enjoyed this bread!
Tara
I feel like you knew exactly what I was craving at this very moment! Deliciously cheesy bread with spicy (but not TOO spicy) jalapenos. I am going to use this bread as a side (and dipper!) for my chili!
★★★★★
Team Life As A Strawberry
YAY! We love the idea of having this bread with chili!
Jen
I love the combination of cheddar and jalapeno in this bread! It's so delicious. All of the tips included with the recipe are really helpful for beginner bread makers like myself.
★★★★★
Team Life As A Strawberry
WAHOO! So happy to hear all the tips were helpful!